Category: Plants

  • Backyard Pond

    Backyard Pond

    Creating a water feature in your yard used to be difficult back in the day when lath and plaster or concrete were used for construction.  We now have pre-formed pools and pond liners that make for a weekend job.  A water feature is an attractant for birds and other wildlife and can be relaxing when the water is moving creating a peaceful sound. 
    The first step is to decide where you want to locate the water feature. You will want to be able to see it from a deck, patio or windows from inside the house so that you can enjoy watching the wild life that will be attracted to the yard. Also, place it so you can hear the gurgling of the water for the peaceful vibe.
    If using a preformed pool use a piece of rope or hose to outline the pool edges to the ground. Next excavate the hole while following the profile of the pond including any interior shelves. Place the pond into the hole occasionally to check the fit. Make the hole a bit larger than the pond which will make back filling easier. To check the depth of your hole lay a piece of wood across the opening and measure to the bottom. Then place your pool into the hole and check that it is level with the land around it. If you have rocky soil you may want to add a shallow layer of sand to create an even surface for the pool. Now it is time to add water and begin packing soil around the edge. Packing the soil as you fill the pool with water will ensure the levels of the pool remain true to the original shape being especially vigilant under the shelves of your pool. Be sure your back fill does not raise the levels of the edges around your pool.
    If you decide you would rather create a free form water feature there are now pond liners you can use. Once again create the shape of your water feature using rope or a hose. Excavate the soil to the desired depth leaving a shallow ledge about half the depth of the pool. You can use the excavated soil to create raised garden beds to make your water feature look more natural. Or you can remove the grass from around the hole to allow for pavers creating a neat edge. Now remove any sharp stones or roots sticking out of the soil and place a cushion of ½ inch of sand on the bottom of the excavated hole. If you have a very rocky soil you can purchase a polyester matting material designed for the job of protecting the pond liner. Now it is time to place the liner in the hole. Drape it loosely in the hole making sure there is sufficient overlap all around. Hold the edges in place with rocks or bricks. Fill with water while lifting the bricks occasionally to allow the liner to settle into the hole. Remove any creases by stretching and adjusting the liner as it fills. Once the pond is full, cut off the extra liner leaving at least 6 inches all the way around. This will be covered and held in place by the pavers or pins and excess dirt used to create your gardens.
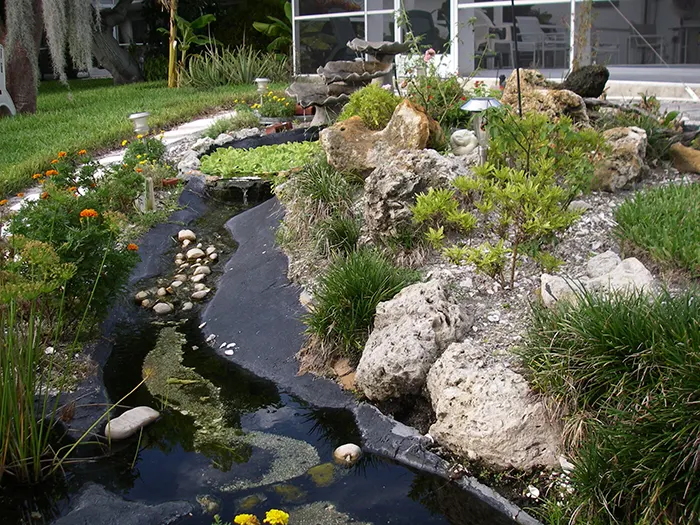
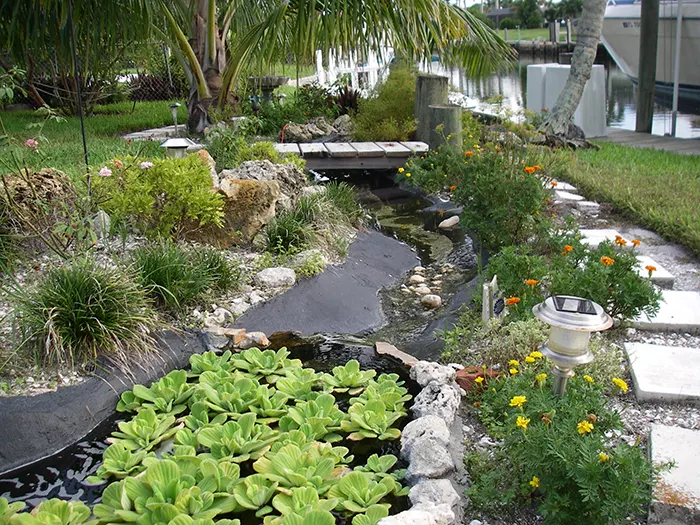
    My late husband, Peter, built a magical pond and stream creation in our back yard over 20 years ago using the old lath and plaster method. Our waterfront back yard had just the right slope for a running stream with waterfalls along the way. He dug an upper pond which connected to a lower pond with a winding stream that included mini rapids and several small waterfalls. The water was circulated back to the top using a pump in the lower pond which brought the water back to the upper pond via underground pipes. Unfortunately, several hurricanes damaged the plaster liner causing serious leaks. While still an interesting landscape feature, it has not been a working water feature for over a decade. I plan to resurrect it using flex seal paint to repair the cracks and look forward to the sound of gurgling water and the wildlife it will attract.
    If you want to add plants to your water feature there are many aquatic plants you can purchase. You simply use an old tub or plant them in the containers they come in. There are special planting baskets that you can line with burlap or a special liner to hold in the soil. After planting with soil cover the surface with gravel to hold the plants in place until they have a chance to root. Place them in the shallow areas of your pond. There are also floating plants like water lettuce that your simply place in the water. Be careful not to buy or accept from a well-meaning friend invasive water plants. That is the equivalent of taking invasive cuttings of landscape plants. You will regret it as they spread uncontrollably and take over your water feature.
    If you decide to add fish do not release them into the pond before floating the bag in the pond water for a couple of hours to equalize the temperature of the bag and the pond. And do not leave them in the bag too long as the oxygen can be depleted starving the fish of their much needed oxygen.
    So if you have always wanted a backyard pond next weekend might be a great time to get it done.  Happy excavating!
  • Hard Summer Months

    Hard Summer Months

    The official start of summer is almost here with the beginning of June.  June is the start of the rainy season as well as the first month of hurricane season.  Here we go!
    Temperatures and humidity begin to rise with highs in the 90s and lows in the 70s. While we may see a lot of rain we may also experience periods with little or no rain. Due to the increased transevaporation rate, these higher temperatures can cause water stress on lawns, shrubs and trees in a short period of time. So it is important to have your sprinkler system on and set to twice a week allowing for one inch of water per week with a rain sensor that will turn the system on and off with ½ inch of rain. That way your system will water even if we have those short bursts of rain that only water a fraction of an inch.
    If you have not fertilized yet you need to get this done. The plants will tolerate the higher temperatures and stress of summer much better if they are healthy and well fed. Also, it is better to not fertilize in the summer as it can cause excessive growth which thins and weakens plant cell walls allowing for disease problems. Not to mention the extra work it will create for all you gardeners out there. Use a lawn fertilizer with 50% slow release nitrogen and equal amounts of nitrogen and potassium. If you have palms in your landscape they will especially like this analysis. An example is a 15-0-15 analysis. For shrubs and palms choose an acid and palm mix which will help lower the ph. of your soil. The ixoras, gardenias and magnolias will do well with this fertilizer along with most of the plants in the landscape. Mulch will help with weed suppression and as it decomposes will also add organic matter to the soil and help to lower the ph.
    Shrubs and trees should be prepared for hurricane season by pruning and trimming back. Formal hedges should be trimmed often enough so that you are trimming only new and supple growth. Individual shrubs that have overgrown the bounds of the garden should be brought under control before the growing season of summer gets underway. You can either head back by trimming all terminal branch ends back to your desired size or thin the shrub by trimming longer branches back into the shrub reducing the overall size of the shrub to allow for summer growth.
    Trees should be thinned of crossing and interfering branches removing any that touch buildings or are too close to overhead power lines. Quite often power outages are caused by overgrown trees blowing into power lines causing short circuits or completely breaking the lines. Also dead branches can disconnect from the trunk and damage anything nearby. So check your trees because the month of June is a good time to contact your tree company to inspect your trees and trim as necessary.
    Palm trees should only be pruned to a 3 o’clock 9 o’clock shape. Never remove so many palm fronds that it goes straight up into the air. Palm trees use their fronds to make food for the tree from the sun through a process called photosynthesis. They also take water from the air for the tree. When you remove too many green fronds the tree’s ability to make food is greatly diminished. Another reason is that the heart or growth point of a palm is in the middle of the fronds directly above the brown wood of the trunk. When you remove too many green fronds it exposes this area and weakens it making the entire top of the palm tree susceptible to breaking off during hurricane winds. The term “hurricane cut” should not mean removing most of the green fronds. It is a bad practice so avoid doing it.

    Most winter annuals are spent and need to be cleaned from your flower gardens if you have not already done so. There are many annuals and perennials that will tolerate our summer heat and rain and can be planted in June. Following are a few:

    • Celosia, Cosmos, Dahlia, Marigold, Portulaca, Salvia, Sunflower, Berbena, Vinca and Zinnia.
    • Bulbs for our area include: Caladium, Canna Lily, Crinium lily , Day Lily, Gloriosa Lily and society garlic.
    Some pests to watch for include aphids, whitefly, scale and caterpillars on shrubs.  And Chinch bugs, grubs and mole crickets on lawns.  And with the start of the rains disease will become more prevalent. 
    Put on your hat, gloves and sunscreen and prepare yourselves for the hard summer months of gardening ahead. June is just the beginning.
  • Flush of growth with the Summer rains

    Flush of growth with the Summer rains

    May is here which means that summer is just around the corner.  May temperatures usually average highs in the 80’s and lows in the 70’s.  We will have some rain but not as much as June will bring.  Watch your lawn for water needs.  If you turn your sprinklers off because of rain don’t forget to turn them back on.  It is very hot and our sandy soil will dry out quickly.  Once again, I would advise everyone to have a rain-sensor installed to turn the sprinklers on and off automatically after rains.  This devise won’t forget to turn the system back on the way people do.  In the past we have been under watering restrictions this time of year, allowing only two days of watering a week.  This is not the hardship people think it is as two days a week is really all you should have to water if you condition your lawn by watering less often and growing deep root systems.  With droughts becoming more severe we may find restrictions in the future that allow for one day only.  If you have a deep root system you should have few problems with that.
    The spring flush of growth which your plants experienced has now hardened but there will be another flush of growth with the summer rains. And along with this new growth will be more aphids to enjoy the new, tender tips of your plants. They excrete a honey dew like substance onto the stems and leaves of the plants they are feeding on. This honeydew is soon attacked by a black, sooty mold. Some people mistake this for disease and treat with a fungicide when they should apply an insecticide for the aphids or other sucking insects. You can wash this unsightly sooty mold off with a strong hose. Scale, whitefly, thrips and various worms and caterpillars will also be a problem on your plants in May.
    On the lawn, mole crickets begin to hatch around the end of May or early June. These insects are more of a problem in Bahia grass than St. Augustine grass. However, they have been known to attack and damage St. Augustine. They loosen the soil and feed on the roots of the grass. Look for yellow streaks and a softness of the soil which you can feel when you walk on the lawn. Treat quickly with mole cricket bait. Also, mole crickets are attracted to bright light. It would be helpful to use yellow colored, bug lights in your outside fixtures so you don’t attract this insect to your lawn.
    Chinch bugs can become active after any rains we may have. Be sure to watch for yellowing of the grass blades especially along sidewalks and driveways or along edges of damaged areas in the lawn. Treat with insecticide labeled for chinch bugs.
    Gardenias are blooming profusely. When they are finished blooming is the time to prune them back if you are going to. Remember that gardenias set flowers on old growth so you want to prune now and leave the plant alone until it flowers again next spring. Some varieties will bloom year round. Be sure to prune selectively leaving some old growth for flowering each time you prune.
    A lot of bulbs have finished flowering. Remove the old flower stalks and seed pods as soon as possible as they take strength from the bulb and could adversely affect next years’ flowering. You can plant the seeds for new plants but it will take several years for the new plants to flower. This is also a good time to dig your bulbs and separate the bulblets for replanting. These will also take years to flower for the first time.
    Winter annuals are already showing signs of stress from the heat. By the end of May most will be ready for removal. It is time to plant summer annuals in their place. You may want to plant some perennials and bulbs in with your annuals so you don’t have to replace entire beds at one time. Some summer annuals are celosia, coleus, crossandra, gaillardia, gazania, marigold, nicotiana, ornamental pepper, pentas, portulaca, salvia, vinca and zinnia.
    You can prune your flowering trees if they have finished flowering. May is also a good month to plant and transplant ornamentals and trees. Wait for the drought to be over first.
    Remember, summer is just around the corner and with summer comes the rain and the tremendous growth of everything in your yard. Are you ready?
  • Pretty pink trees blooming in the Medians

    Pretty pink trees blooming in the Medians

    There are many flowering shrubs and trees either in bloom or just beginning to bloom right now around Marco Island.  Several people have asked me about the pretty pink trees blooming in the medians.
    The Tabebuia heterophylla or pink tabebuia is a variety that will grow to 50 feet and so needs plenty of room.  There is also a dwarf variety, T. bahamensis which will only grow to 7 feet. This is the variety you see blooming right now in the medians.  Most landscapes are too small for the larger variety so be sure what you are buying.   
    The Tabebuia caraiba is a beautiful, yellow tree that is also blooming along our streets. They grow to 25 feet in height and have a compact, upright habit of growth making them a good choice when space is limited. The tree is deciduous in winter and will make quite a mess while losing its leaves. The reward is the bell shaped, yellow flower produced in profuse clusters before the new foliage forms. They prefer full sun, average moisture and good drainage. No pests bother this tree.
    The Hong Kong Orchid tree has an orchid like flower 6 inches wide and rose-purple in color. The flower has a delightful scent which fills the air around the tree. They are an open, spreading shade tree which will grow to 35 or 40 feet in height with a 30 foot spread. The tree is evergreen but loses some leaves when in bloom. They prefer full sun, moist to semi-moist, well-drained soil conditions. There is also a pure white flowered variety, B. purpurea candida, which they have planted along with the pink tabs in the medians.
    The Frangipani Plumeria is also getting ready to flower. This is another fragrant tree which fills the air with a nice, light scent. The flower is used to make the Hawaiian lei. They are a small broad crowned tree which will grow to 20 feet in height with a 15 to 20 foot spread. The flowers come in yellow, pink or white. They lose their leaves in the fall although there is a variety that does not defoliate. The stiff, thick branches are interesting with no foliage until they begin to flower in spring and summer. Full sun is best with rich, moist loam.
    The Confederate Jasmine is a woody vine with pure white, 1 inch fragrant flowers. They will grow to 20 feet if supported with arbors or trellises. This vine can also be trained in espalier fashion. The Jasmine Minima is a dwarf ground cover variety and lacks the fragrant flowers. San Marco Villas on San Marco Road has beds of the confederate jasmine throughout the front landscaping. You can smell it in the air when you drive by.
    The Gardenia is a rounded shrub which will grow to 8 feet tall by 6 feet wide. They produce handsome, white flowers up to 5 inches wide in the spring and early summer. The gardenia is valued especially for its fragrance. They prefer sunny locations with fertile soil and good moisture. Pests which attack the gardenia are aphids, scales, mealybugs, white fly and nematodes. It is best to by grafted stock.
    The Bougainvillea is also entering the height of its flowering season. It has had a setback because of the desiccating winds of past winter storms. Look more closely if your bougainvillea looks dead on the one or more sides. If you see the new leaves already emerging leave it alone and it will begin flowering before you know it. The various reds and purples of this plant are bright spots in the landscape. They have an upright, sucker growth which will add several feet to the shrub each season. They are a very thorny stemmed plant. A less thorny species has the rose red flower bracts. A dwarf variety has a low compact growth habit. The bougainvillea thrives best in full sun with normal watering. They won’t flower as well when planted in a moist soil or shady location. This is another plant suitable for espalier, arbors or even climbing trees. They are also good for use in pots.
    These are just some of the flowering shrubs and trees which help to make Marco a colorful place to be in the spring. Enjoy the color Marco Island!
  • Garden Column

    Garden Column

    This week we celebrate Earth Day.  This holiday was first celebrated in 1970.   It is a great day to think about the beautiful environment surrounding us on Marco Island and how to perhaps create habitats (think your yard) that are more friendly and inviting to the environment and the creatures that call it home.
    The flora and fauna of South Florida are quite diverse, made up of microclimate environments called communities.  Each of these communities has its own plants and animals that rarely leave their own area.  These are broken out as coastal dunes, hammocks, freshwater swamps or wetlands, saltwater wetlands, sand pine scrubs, dry pineland and pond and river margins.  Marco Island has areas that would apply to all of these communities. 
    Coastal dunes B Hideaway beach; Hammocks B Indian Hill or Key Marco; Freshwater swamps or wetlands B Marco Lake; Saltwater wetlands B along Caxambas Drive, behind Sheffield or Key Marco fringe; Sand pine scrub or dry pine land B inland Marco Island and river margins along the Marco River.
    The majority of our flora is tropically oriented.  Nurseries tend to sell a lot of imported exotic plants from other places but there is a trend back to native plants as awareness of water and energy issues arise.  True native plants can better survive our seasonal weather extremes without special care and watering once established.  They also provide habitat for local fauna.  While still hard to find, more and more local nurseries are able to obtain most natives you might want.  The fire bush flowers all year and attracts butterflies and the beauty berry has bright purple berries that the birds love.
    A lot of the more colorful shrubs, which were imports long ago, have become such a common site they are considered by most to be native.  Hibiscus, bougainvillea and ixora are a few examples that fill our landscapes with color.  While they are beautiful, they require constant care from insects and disease, cold damage and extra watering.  A trend toward using exotics more sparingly and introducing more native plants to our landscapes would be a good thing.
    As our island develops the last remaining habitats for our local fauna are disappearing.  Some, such as the egrets and eagles, have adapted to life with man.  Egrets will get in front of my mower and I have to come to a complete stop as they go after the bugs I stir up.  A nesting pair of eagles lived in a nest for over twenty-five years two feet from the back yard of a house I maintained on Shadow Ridge Court.  This lot happens to be at the end of the practice driving range of the Island Country Club.  These eagles endured my lawn mower, weed whip and hedge trimmers as well as the big machine that traverses the driving range picking up the golf balls at the end of the day.  Not to mention the occasional wild ball that probably hit the nest.  I watched many baby eaglets fledge from this nest.  Others, like the pink flamingo and the quail, have slowly perished.  I never got to enjoy the pink flamingos but used to love watching quail families cross the streets.  You rarely see them anymore.  They, like the burrowing owls, lived in our vacant lots, which are mowed regularly.  We now protect the burrowing owls but it is too late for the quails.  One thing we could do to try to save some of our local fauna is to create backyard habitats for wildlife.  This does not necessarily mean you have to have a wild yard.  You should simply think about your plant choices and consider how these plants could help the wildlife you would like to attract.  Provide small fruits and seeds for birds and a source of water.  Have tall grasses or a brush pile for animals to hide in.  Leave open sandy areas and begin a burrow to attract owls or tortoises.  Native plants are a better choice since Florida wildlife evolved with Florida plants.  Maybe the city would consider allowing vacant lots to return to a native state to become mini wildlife refuges.
    To create an environment that suits your property, keep your environmental community in mind.  Don’t try to grow salt sensitive plants on the beach or plants requiring good drainage in low, boggy areas.  A jungle or hammock will be cooler in the summer and warmer in the winter because they maintain a uniform climate of high humidity and frost- free temperatures making then suitable for most tropical plants.  After establishing the more hardy canopy plants you can introduce the more tender, under-story plants as the yard begins to mature.

    Things to remember when creating a habitat are:

    You must provide food, water and cover for the wildlife.

    The habitat area must be at least 10 square yards.

    You should use at least 50 percent native plants in your habitat area.

    You do not have to completely re-landscape to establish a habitat. Select a small area of your landscape and add some of the features listed above. An example could be a flower garden to attract butterflies with a birdbath in the middle. The flowers would provide food for the butterfly larvae and the larvae would provide food for birds attracted by the birdbath. We installed a pond system in our back yard and have several bushes and trees with fruits and berries. We love watching our backyard as the diverse species of birds and butterflies come and go. We see cardinals, blackbirds, redheaded woodpeckers, pileated woodpeckers (I just saw one two days ago), purple martins (there are special houses for them), and the favorite with our visitors, a gray heron that feeds on frog eggs from the ponds when available. There are many more I have not identified who stop in on their migration north or south.
    Or, if you have always wanted to live in the woods you can create your own jungle or hammock and screen yourself from your neighbors, street noise, cut your fuel bill and attract birds, butterflies, squirrels and other small creatures to your yard, not to mention spending less time, energy and money keeping a lawn in shape.  The most maintenance needed would be to pick up fallen branches and pull unwanted weeds.  If properly planted, a jungle or hammock on a small lot can be attractive in the wild state.  You can experience and live in the real thing in the community of Key Marco.  Their woods are home to bobcat families with kittens and one of the largest tortoise populations on Marco.  One spring day I watched as a flock of Indigo Buntings flew by in undulating beauty.
    Some animals are happy to live in our neighborhoods as they are, no changes needed.  The homes on Dogwood and Sheffield have similar plant communities and wildlife as does Key Marco with bobcats spotted running through the yards and many tortoise burrows.  In the front yard of one of my homes on Dogwood Drive a very small tortoise burrow appeared in the front lawn.  I only realized what it was because I see so many of these tiny burrows in Key Marco.  I protected it with flags and my crew and I watched as the burrow and the tortoise grew over the summer months.  When the homeowner returned for the season with her dogs we thought the tortoise might abandon the burrow for safer living arrangements, but it stayed put and now lives with our weekly mowing and the dogs.  In the Copperfield Court neighborhood you used to see many rabbits darting from yard to yard taking refuge under hedges and bouncing through the vacant lots.  The end of Laurel Court used to have a resident chicken!  That is until a new house was being constructed and it disappeared.  This chicken would garden alongside me happily eating whatever I stirred up for him.  What a treat.  And let us not forget the snakes.  I have been begging people to leave them alone and not kill them for years.  I do see more large snakes now than I have in the past but we still have a long way to go on that one.  Remember they eat rats and keep the populations down so we don’t have as many in our attics.   
    We are all so fortunate to live on an island surrounded by exotic tropical plants, birds and animals which most people never have the pleasure of seeing in their lifetimes.  Rather than scaring them all away with our development let us develop habitats in our own backyards to attract them to live alongside us here on beautiful Marco Island.  Happy Earth Day everyone!
  • Landscaping

    Landscaping

    When it comes to landscaping, simplicity equals good design and low maintenance. Low maintenance landscapes are designed so that every shrub, tree and flower-bed will all have definite functions. It is best not to over plant and to eliminate as many frills and flower beds as possible. Fewer, well placed gardens help reduce landscape maintenance.
     Arrange your plants in masses. Scattered plants need edging and weeding and can complicate mowing. Avoid planting grass where it is too shady, dry, wet or too steep to be safely mowed. Use ground cover or other plants in these areas. Mulches help to minimize weeds and help retain moisture. Use gravel, bark or pine straw and occasionally pull or spray weeds that come up. Don’t over fertilize. It isn’t a good horticultural practice and results in more pruning or mowing. It also invites insects to all the tender new growth.
    A bed around trees eliminates trimming and speeds mowing. It will help to protect the bark from damage by the lawn tools. Make the beds wide enough so you don’t run into low hanging branches when mowing. Define borders of walks, driveways and beds more clearly with metal, wood or brick edging. This also helps keep stones and mulch in place and the grass from growing into walks, etc. thus reducing trimming. Create paths with gravel, stepping stones or paving where foot traffic is heavy. Be sure walks and gates are wide enough for the lawn maintenance equipment. Power equipment speeds maintenance time.
    Use fences or hedges for privacy or a wind break. A fence would require less space than shrubs or you can select plants which are low maintenance. When planting a vegetable garden only grow what your family can use. Allow enough room between rows for easy cultivation. Power tilling would save hours of hand work. Narrow beds are easier to weed in the center. Large masses of annuals give you bold color with less maintenance.
    Prune trees so the wind can move through them and so more light reaches the grass through the thinned branches.
    Native plants are suited to our local climate and soil and are less susceptible to pest problems making them lower maintenance. Use plants with few insect and disease problems and those that are slow growing for less pruning. Buy quality plants. Replanting or treating sickly plants takes time and money. Inspect your plants before you buy them. Shop at reputable nurseries and garden centers that are neat and well cared for. Don’t buy plants with excessive new growth or with scarred, cracked or peeling trunks or branches. Plants should be compact and not leggy. Inspect leaves for proper shape, size and color and examine them for insects or disease problems. Make sure the root system is not growing out of the pot.
    Nothing is more important than good planting practices. Prepare your planting hole with water, fertilizer and any necessary amendments. Be sure your plant is in a site it prefers. Practice preventative maintenance. Keep plants and lawns well fed and watered and they will be vigorous and healthy. This is the best way to prevent problems which in turn increase maintenance needs.
  • Citrus Tree

    Citrus Tree

    A lot of Marco Island homes have citrus trees in the yard.  Unfortunately, the hurricanes this summer have damaged many of them.  Citrus is not salt tolerant.  Most trees suffer no damage from salt water even though they are in back yards next to canals.  But the constant tropical storm winds carried enough salt in the air to coat the trees with salt and burn the branches and foliage.  If your citrus trees appear to have a lot of dead wood facing the water this is why.  You can have the dead wood trimmed back to healthy, green wood to encourage new growth on the damaged side.  Also, January is one of the months to fertilize citrus so be sure you don’t miss this chance to fertilize.  And to encourage regrowth you may want to lightly fertilize every month through the summer avoiding the time when the tree is flowering.

    The planting and care of citrus trees is very important. Many do not survive due to a lack of understanding of proper care.

    Citrus need full sun and anything less will affect the growth and production of the trees.  Appropriate spacing is necessary as most citrus trees are rapid growers and large round trees.  Plant citrus trees at least 20 to 25 feet apart to allow for mature growth.  Citrus trees should be planted at least 15 feet from buildings or other large ornamentals.

    Before planting clear the area of all grass and weeds.  Add 4 to 5 shovelfuls of organic matter like peat moss or manure to amend sandy soils. Citrus trees will not tolerate sitting in wet soil so avoid planting in boggy areas unless you raise the soil level by building a planting bed.

    Citrus can be planted any time of the year but late winter to early spring is the best time.  Make sure the tree you select is healthy with a nice straight trunk.  If it is diseased or insect infested, or if the roots are coming out of the drain holes indicating a potbound tree, leave these at the nursery.  When ready to plant remove the tree from the growers pot and check for roots which are spiraling around the root ball.  Gently pull these roots free so they protrude from the ball.  If the tap root is coiled at the bottom soak the root ball for several hours in water to allow for some straightening of the tap root and any other badly coiled roots before planting.

    Dig the planting hole large enough that you can spread the roots out if necessary.  Set the plant slightly higher than it grew in the container making sure the bud union (or grafting site) is at least 6 inches above the soil line.  This area of the tree is very vulnerable to infection of foot rot, a soil fungi which are splashed onto the susceptible area.

    Backfill half the hole and compress the soil to remove air pockets.  Water to help settle the soil around the roots and finish filling the hole.  Form a water basin around the tree by making a ring of soil 4 to 6 inches high to allow for adequate watering while the tree is young.  Do not mound the soil around the base of the tree!  Leave the water basin for six months to a year.

    Water your new tree two to three times a week for the first month and then twice a week for the next month.  Taper off to a thorough watering once a week if there has not been adequate rainfall.

    The only pruning necessary on a citrus tree is to remove sprouts or suckers from the trunk or to remove dead wood or crossing branches which could cause damage to the other branches.  Also low hanging branches to allow air flow under the tree.

    Do not fertilize your new tree until it shows signs of new growth.  Spread the fertilizer evenly in your water basin the first year and then enlarge the area after that to cover an area twice the diameter of the tree canopy and water in thoroughly.  Use a balanced citrus special fertilizer with the necessary minor elements four to five times a year the first year.  The first application should be in February and the last in September.  The second year fertilize four times and three times thereafter in January, June and October.

    Citrus can suffer many insect and disease problems.  Listed below are some of these problems.

    Keep the area beneath the canopy free of weeds to the drip line.  The herbicide Round-up is safe for use under citrus.  If you chose to cultivate your weeds keep it shallow as the citrus tree has shallow and widespread feeder roots.  Mulching citrus is not recommended as it can increase the chance of infection by the soil borne fungi which cause foot rot.

    Foot rot is a leading cause of death for dooryard citrus.  This destructive soil borne disease of citrus is encouraged by high soil moisture, planting too deeply, mulching or too many weeds under the canopy of the tree.  Foot rot lesions develop at or just above the bud union and on the bark of the crown roots.  The first sign of infection is drops of gum on the bark.  The bark near the lesion will be brown and slippery.  As the dead bark dries it shrinks and splits, eventually sloughing off and girdling the tree.  The part of the tree fed by the damaged bark dies and so the disease progresses.

    Another common disease of citrus roots is root rot which causes the destruction of the shallow feeder roots mentioned earlier.  Roots infected with this disease will have decaying outer tissue which easily slides off the root.  If new roots don’t regenerate quickly enough the tree starves to death.  Root rot may have no above ground symptoms.  Often the tree will look good one week and be dead the next.

    Cultural practices to follow to avoid these diseases in your citrus trees are as follows:

    • Prune low hanging branches to allow good air circulation and light under the canopy.

    • Plant new trees at or above the level they were in the container – never lower.

    • Keep soil, weeds and brush away from the base of the tree.

    • Avoid mulching which causes high soil moisture.

    • Use chemical rather than mechanical weed control to avoid damaging the trunk and feeder roots.

    You can try to control or slow the progression of the disease on older trees with chemicals if you catch it in the early stages of the disease.  First remove the soil from the base of the trunk and crown (top) roots in an area one to three feet in all directions.  Washing with a low pressure hose is a good way to accomplish this.  Second, remove all diseased tissue including about an inch of healthy tissue beyond.  Third, drench with a systemic fungicide specific for phytophtora.

    Some insects which affect citrus are mites, scale, whitefly, mealybugs, aphids and caterpillars.  There are many beneficial enemies of all of the above pests and they do a good job of keeping these pests under control so you can avoid using chemicals on your trees.  Parasitic wasps, ladybeetle and lacewing larvae, and adult ladybeetle are some of the more common beneficial insects to watch for.  If you should need to spray, Malathion is a good choice for citrus.  Two parasitic fungi infect immature whitefly.  Red Aschersonia form pink and reddish pustules 1/8 inch or less on the underside of the leaves.  It is very colorful and noticeable.  Acgerita or brown whitefly fungus appears as cinnamon pustules also about 1/8 inch diameter on the underside of leaves.  This fungus is often thought to be Florida red scale.  There are other fungi which attack citrus mites, especially in the summer.

    Sooty mold is caused by insect honeydew left on the leaves while feeding.  Controlling these insects will prevent this and an oil spray will help the fungus flake off cleaning the fruit and leaves.  Scab, melanose and greasy spot are all diseases of fruit and leaves of citrus trees.  Copper fungicide sprays will bring these diseases under control if they get out of hand.

    It is best to depend entirely on natural control of insects and disease on your citrus trees.  Many are never sprayed and yet the trees survive and produce good crops of satisfactory fruit.

    There are several other problems homeowners may experience with their citrus trees.  Blossom and fruit drop may just be the tree ridding itself of excess fruit or it could be the result of improper fertilizing.  Be sure to fertilize three times a year with a quality citrus fertilizer.  Do not fertilize while the tree is flowering as the nitrogen can cause the blossoms to fall off.  If you are late with your January fertilization wait until the fruit has formed and set before you fertilize.  Improper watering during the dry spring months when the tree is flowering and setting fruit is another cause of blossom drop.  Be sure to provide irrigation at regular intervals during the dry months.  And strong winds will cause blossoms and small fruit to drop.

    Granulation of citrus fruit causes enlarged, hardened and colorless juice vessels.  Several factors can contribute to this problem.  Young trees are more likely to have this problem than older trees and large fruit more than small.  Leaving the fruit on the tree too late in the season.  High soil moisture.  This condition may be inherent to particular trees as it tends to recur in the same trees year after year.

    Fruit splitting can be a problem in September and October.  Nutritional deficiencies, especially copper, can contribute to this problem.  Or after a series of heavy rains, especially following drought, the tree takes up a lot of moisture and forces it into the fruit.  The fruit is nearing maturity and the rind has become less pliable and splits.  To prevent splitting on future crops use a balanced fertilizer program and make sure you irrigate uniformly during the growing season.

    Citrus canker and citrus greening are two very serious diseases of citrus and I will go into more detail in a later column on these diseases.

    Citrus canker is a serious disease of citrus especially for commercial growers.  It causes unsightly lesions, premature fruit drop and can weaken and kill a tree.  The only sure way to get rid of canker is by destroying infected or exposed trees.  This disease has been discovered in many groves in our area and also in backyards in Golden Gate.  State or federal inspectors may request access to your property to examine your citrus trees if canker is discovered in our area.  They will be from the U.S. Department of Agriculture or Florida Department of Agriculture and Consumer Services.  They will inspect the trees and take samples if canker is suspected.  If the tree is infected it must be destroyed.  Your trees will also be destroyed if they were purchased from a nursery exposed to canker.  This is a necessary evil to protect our commercial citrus groves.

    This disease is highly contagious and can be spread by wind driven rain, lawn mowers, pruning tools, animals and people and the movement of infected plant materials.  As a lawn care company we recently received a notice of quarantine area from the Fl. Dept. of Ag. & Consumer Services.  Within this area they regulate businesses whose activity may result in the spread of canker.  There are special regulations regarding disinfection of personnel, vehicles and equipment and special handling and procedures for moving and disposing of plant clippings and yard debris.  In order to work inside the quarantine area (they provide you with a map detailing the area) all lawn maintenance operators must enter into a May 1999 Compliance Agreement agreeing to follow decontamination procedures.  Failure to do so will result in your business being suspended from working in the quarantine area and a violation.

    The cooperation of all homeowners and horticultural workers is necessary to eradicate citrus canker from Florida so that we can continue to step out the back door for some fresh citrus off the tree.  

  • Bulb

    Bulb

    Daffodils and tulips are my favorite flowers because it was a sure sign of spring in Connecticut when they began popping up in the fields and yards. While we cannot grow daffodils or tulips this far south we do have some bulbous plants that are beautiful.

    Amaryllis

    These bulbs show pretty green leaf-like foliage in the garden most of the year. One of the most beautiful bulbs we can grow here in South Florida is the amaryllis. They come in varying shades of pinks and reds. Bulbous plants will thrive and produce these beautiful flowers year after year with proper care. These plants have thickened underground storage organs which enable them to survive unfavorable environmental conditions. These underground organs are also the propagative units of the plants. Not all bulbous plants are true bulbs. Other underground storage organs include corms, tubers, tuberous roots and rhizomes.

    Bulb Scales

    A true bulb is a compressed stem or basal plate bearing a flower bud enclosed by thick, fleshy scales called bulb scales. Some true bulbs such as narcissus, amaryllis & tulip are protected from drying and mechanical injury by dry and membranous outer scales called a tunic. Other true bulbs such as lilies are called non-tunicate or scaly because their outer scales are succulent and separate, giving the bulb a scaly appearance.

    The Corm

    A corm is a solid mass of stem tissue with a terminal bud on top. Axillary or lateral buds are also produced at nodes on the corm. The solid stem structure of the corm is protected against injury and water loss by dry leaf bases that are similar to the tunic that encloses true bulbs. Gladiolus is a corm.

    Caladium

    A tuber is a thickened underground stem with many buds on its surface. Tubers are covered with a tough skin rather than a tunic or scales like true bulbs and corms. An example of a tuber is a caladium.

    Dahlia

    Tuberous roots, such as dahlia, are true roots and lack nodes and inter-nodes. Buds are present only at the crown or stem end of the root.


    Rhizomes are thickened horizontal stems growing along or below the surface of the ground. Underground rhizomes of canna and calla produce roots on their lower surface and send shoots above ground.

    “Florida’s climate is favorable for growing many tropical and subtropical bulbous plants.”

    Florida’s Climate

    Florida’s climate is favorable for growing many tropical and subtropical bulbous plants. Unfortunately, many of the common bulbs of northern states such as tulips, hyacinths and daffodil do not grow well in Florida. These bulbs flower poorly or not at all. With special treatment many of these northern bulbs will grow and bloom the first year. Recovery and planting the following year is not recommended since they rarely flower again.

    Well-drained Soil

    Most bulbs thrive in a sunny location. Some, such as caladiums, do best in partial shade. Heavy shade should be avoided as it will cause thin spindly growth and poor foliage color and flowering. Bed preparation is important for successful bulbs. A well-drained soil is important. You should till and amend the soil with three to four inches of organic matter and fertilizer.

    Dig holes to the recommended depth for the various bulbs and plant with points facing up. Firm the soil around and over the bulbs and water.

    Water is Crucial

    Mulch the beds to control weeds. Weeds that do grow through the mulch should be pulled before they become firmly established in the bed.


    Fertilize once or twice during the growing season with a special bulb fertilizer. Bulbs such as tulips which are discarded after flowering do not need fertilizing since they have enough stored food to last through the blooming period.


    Water is crucial when growing bulbs and it is important that they not dry out during growth and flowering.


    Keep the soil moderately moist at all times except when drying off at the end of a growing period.

    Good Cultural Practice

    A good cultural practice is to remove dead blooms before seeds are produced. Flowering in the following season will be reduced if seeds are allowed to set. Removing seeds also adds to the aesthetic value of the plants and may prevent disease problems.


    Many bulbous plants grow best if left in the ground year after year while others may become crowded and bloom poorly. Digging and replanting encourages more uniform and larger flowers.


    True bulbs like amaryllis and hyacinth, develop miniature bulbs, known as bulblets, which grow into offsets. Offsets can be separated from the mother bulb and replanted into the beds. Depending on the kind of bulb, it could take several years before they reach flowering size.

    Corms & Cormels

    Corms, such as gladiolus, produce new corms on top of the old corms, which wither. Miniature corms called cormels are produced between the old and new corms. These can be separated from the mother corms and stored along with the new corms over winter for planting in the spring. Cormels also require two to three years to reach flowering size.


    Tubers (caladiums), tuberous roots (dahlia) and rhizomes (canna, day lily) are propagated by cutting them into sections, each containing at least one bud.

    Tuberous roots that are broken off without a bud are worthless.


    Bulbous plants can be moved anytime except when they are in bloom.


    Some examples of bulbs, corms, tubers, tuberous roots and rhizomes and their flowering seasons:


    Bulbs
    Amaryllis – Spring
    Amazon lily – Winter
    Aztec lily – Spring & Summer
    Blood lily – Summer
    Crinum – Spring & Summer
    Society garlic – Spring, Summer & Fall
    Spider lily – Spring & Summer


    Corms
    Gladiolus – Three months after planting
    Tritonia – Spring & Summer
    Watsonia – Three months after planting


    Tuber
    Caladium – Summer to Fall
    Glorioso lily – March to Summer
    Elephant ears – Spring


    Tuberous Root 
    Dahlia – Early Summer


    Rhizomes
    African lily – Summer & Early Fall
    Butterfly lily – Spring
    Cana – Spring to first frost
    Day lily – Spring & Summer

[yith_woocommerce_ajax_search preset='default']